Client bank in 1s 8.3 accounting lesson. Interaction with systems such as "bank client". Downloading statements from the Client-Bank program
Payment orders, or payments, are unloaded from 1C 8.3 for their further upload to the client bank. For the correct unloading of payment orders, it is necessary to configure certain parameters of 1C 8.3. How to set up an exchange and how to upload payments from 1C 8.3 to a client-bank, read on.
Read in the article:
After you have created payment orders in 1s 8.3, you can upload them to the client-bank system for payment. The procedure for exchanging payments in 1C 8.3 consists of two stages:
- unloading a text file from 1C 8.3
- uploading this file to the client-bank
To generate an upload file in 1C 8.3, you need to set up an exchange with a client-bank. The exchange setting is needed not only for the correct unloading of payment orders from 1C 8.3, but also for uploading bank statements from the client bank to 1C 8.3. In this article, we will tell you how to set up an exchange and how to upload payments from 1C 8.3 to a client-bank in three steps.
How to unload payments from BukhSoftStep 1. Set up data exchange with a client bank in 1C 8.3
Go to the section "Bank and cash desk" (1) and click on the link "Payment orders" (2). A window will open with a list of previously created payments.In the window that opens, in the "Organization" field (3), select the organization (4) for which you want to set up the exchange. A window will open with a list of created payments for the selected organization. 
Next, click on the "Send to Bank" button (5). A window for exchanging data with the bank will open. 
In the "Exchange with the bank" window, click the "Settings" button (6). The exchange settings window will open. 
Step 2. Specify the data exchange settings in 1C 8.3
In the "Settings for exchange with a bank client" window, specify:- your bank account (1). Select the bank account for which you are setting up the exchange;
- program name (2). Select the bank client program from the list that corresponds to your bank account, for example, "Client-Bank System" CJSC "Bank "New Symbol"";
- bank upload file (3). Here click "Select" (4) and specify the name of the file and its location on the disk. When uploading payments, this file will be used for the exchange;
- the correctness of the document number (5). Check the box if you want the client bank to check payment numbers for repeatability.

Step 3. Upload payment orders from 1C 8.3 to the client bank
Client bank - a program for remote work with your servicing bank. In such systems, it is possible to download files with payment orders from 1C 8.3. To upload a file from 1C 8.3, go to the "Bank and cash desk" section (1) and click on "Payment orders" (2). A list of payments that you created in 1C 8.3 will open.
In the window that opens, select your organization (3). 
Now in the window you will see payments only for the selected organization. Next, click the "Send to Bank" button (4). The "Exchange with the bank" window will open. 
In the window you see payment orders prepared for payment. They are in the Prepared state (5). Payments to be uploaded are marked with checkmarks (6). You can uncheck payment orders if you do not want to pay for them. In the "Upload file to the bank" window (7) you will see the path to the file that you specified in the exchange settings with the client-bank. You can also specify another file to upload. To do this, press the “…” button (8). To save the file with payments, click the "Upload" button (9). After that, the payment status will change to "Sent". Your payments have been sent to the bank. 
The file with payments is visible in the "File of uploading to the bank" field (7). Log in to the client's bank and upload this file to make a payment. You specified the location where this file is located in the exchange settings with the bank (see step 2).
In order not to manually fill in bank statements into your enterprise software, you should ask how to load the bank into 1C 8.3. Simply put, this process can be automated for a long time, you just need to approach this task correctly. Entrust the setting of the 1C program to programmers and you will no longer return to this issue.
How to load banks in 1C 8.3?
If you follow the entire download process step by step, you will end up with everything planned. You must have a good understanding of the system interface. The main action processes are divided into three groups:
uploading from the client bank to a file;
creating a backup;
loading from a file to the 1C database.
These are the fundamental tasks on the way to loading the bank in 1C 8.3. The execution of the first process is as follows: menu "Settings" - "General". In the new window, select "Export".
Be sure to check the box next to 1C "File for exchange" and enter the correct path to the document there. Its extension must be txt only. Next, to load the client-bank in 1C 8.3, we confirm our actions by clicking on "Save". In the next window, click on the "Out" button and select "Export to 1C ...". It can be considered that we have successfully coped with the first of three important processes.
Next, we are working on creating a backup copy for loading the bank in 1C 8.3. This step is your guarantee of safety. It is better to prevent yourself from possible troubles than to eliminate them later. After you have completed this stage, we proceed to the very last and most important task - loading from a file into the 1C database.
In order for the bank to be successfully loaded into 1C 8.3, follow the following chain of actions: the “Bank and cash desk” section, the “Bank statements” item. In the journal, click on "More", go to "Exchange with the bank". A tab called "Download from the bank" will appear in a new window, go into it and click on "Download" at the very bottom.
Automation details in 1C
The entire process of downloading a bank statement in 1C 8.3 can be considered completed if you followed a clearly defined algorithm of actions. If at one of the stages you have any difficulties, please contact technical support. Specialists will help you understand any situation that has arisen, especially when it comes to loading banks in 1C 8.3.
Each user of the software needs to be well versed in all system settings. 1C is a storehouse of functionality that you need to learn how to use, and then the software will work for you. After the correct settings associated with loading the bank classifier in 1C 8.3, the system will become your indispensable assistant.
With the help of the classifier contained in some of the programs, you will always receive up-to-date data regarding the details of banking institutions. In order to load the bank classifier in 1C 8.3, you should go to the "All functions" menu, go to the "Reference book" and stop your choice on "Banks". In the new window, click on the "Pick up" button, then on "Load classifier". We put a tick in front of the entry "from the agency's website ...", at the end of the work we confirm all our actions done by clicking on "Next". Everything, we can assume that you have coped with the loading of bank classifiers in 1C 8.3.
Joint setup with Setby
If you are looking for a worthy specialist in the field of implementation and automation of 1C software, then contact us. Many accountants are trying to independently set up the download of bank statements in 1C 8.3. For unprepared people, this takes a lot of time, and the result is not always satisfactory.
It is better not to save money and trust professionals. Indeed, after you have established the interchange of documentation between banks and uploading bank statements to 1C 8.3 successfully, the work will proceed faster and more efficiently. And this is one of the main goals of any entrepreneur.
The Setby company will provide you with a full telephone consultation, after which you will find out what needs to be done so that the download from the bank to 1C 8.3 is successful. Our technical support works 24 hours a day. Leave your contact numbers and we will contact you as soon as possible.
Setting up an exchange with a client bank in 1C Accounting 8.3 begins with the opening of "Bank and cash-Bank statements".
Fig.1
Here, in the list of documents, click "MORE-Set up exchange with the bank."

Fig.2
Setting up an exchange in 1C with a client-bank for each account of a company involves filling in the fields:
- Organization;
- Maintained bank account;
- Program name. Here you need to select an identifying program. If you are not the name of such in the specified list, then you must select any of the provided list;
- We prescribe the name of the file from where the operations for r / sch will be loaded, and the file into which they will be loaded;
- Encoding. 1C 8.3 can exchange DOS and Windows formats, so we specify the encoding corresponding to the client-bank.
A group of attributes that can be set by default:
- Group for new partners
- DDS articles.
Bottom of the window:
- In the uploads, we indicate which documents will be included in the file and will be controlled during upload (the correctness of the document number and the security of exchange with the bank).
- In the Downloads on the right, we activate the automatic creation of not found elements (i.e., when uploading a statement, the program will automatically create counterparties, contracts, accounts that it did not find in the directories), as well as demonstrating the “Exchange with a bank” form before downloading.
- We immediately note that after loading the documents must be carried out automatically.


Fig.4
To upload or download documents from the client-bank, in the “Bank statements” journal, click “MORE-Exchange with the bank”.

Fig.5
The second option is to click on "Download" in the same place.

Fig.6
We go to the "Exchange with the bank" window.
We select the tab "Sending to the bank", we find the organization for which we need to upload the documents, the bank account and the period for which we upload the documents.

Fig.7
After that, the tabular part is filled with documents, while the red font means that either it is incorrectly filled out, or the payment order is invalid. Black color indicates that the filling is correct, you can upload to the bank-client file.

Fig.8
When choosing the documents that need to be uploaded to the Client-Bank, put a tick in front of them. In the "Upload file to the bank" field, specify the upload path and click "Upload".

Fig.9
The file has been uploaded.

Fig.10
The tabular part will be filled with data from the file, while the lines with red font indicate that the program did not find data in the directories (r / account, counterparty by matching TIN and KPP), to which it is necessary to distribute receipt or write-off documents. Correctly distributed documents are highlighted in black.

Fig.11
If you checked "Automatic creation of documents not found" in the exchange settings with the bank's client, the program will automatically create objects not found, if "Automatic creation of documents not found" - the button "Create not found" will be active, by which the log "Creation of not found objects" is available.

Fig.12
Here, by clicking on the "Create" button, you can create all objects or select specific objects that you want to create.

Fig.13
Having created objects not found, we select by ticking the documents from the statement that we want to download. Click "Download".

Fig.14
Once downloaded, we can view the "Download Report".

Fig.15
It contains information on loaded and unloaded documents into the program.

Fig.16

Fig.17
You can view the uploaded documents in the "Bank and cash desk-Bank statements" block.

Fig.18
Uploaded documents will be displayed in the "Bank statements" journal, completed ones will be marked with a green checkmark.

Fig.19
To set up a direct exchange with a bank, you need to use the DirectBank service. Since the working conditions are set by the bank, you need to find out the settings parameters from your bank.
How to set up loading bank statements in 1C, as well as unloading, and how to make a statement in 1C 8.3?
Let's start by creating a payment order:
- Based on the receipt of goods and services, invoices, etc.;
- Through the creation of a new payment order/PP.
In the block "Bank and cash desk - PP".
Fig.1
A journal with payments will appear in the window that opens, where you can, by setting up the appropriate selection, filter the necessary documents, for example, display a list by a specific organization, bank account, date or counterparty.

Fig.2
Filling in the main fields here begins with the “Type of operation”. Depending on the selected one, the structure of the document will change, as well as the fields of the required dimensions.
Having filled in the main, we hold and close the document with the button "Post and close".

Fig.3
The payment does not make any postings in 1C 8.3, they are generated by the “Write-off from the account”, which can also be created on the basis of the payment order we have generated, or manually, by creating a new write-off.
Creation of receipt/withdrawal from the settlement account
The first option is to create it manually through the "Bank and cash desk - Bank statements" block.

Fig.4
The displayed log shows all receipts and debits from the account. To make it more convenient to work with, you can set filters:
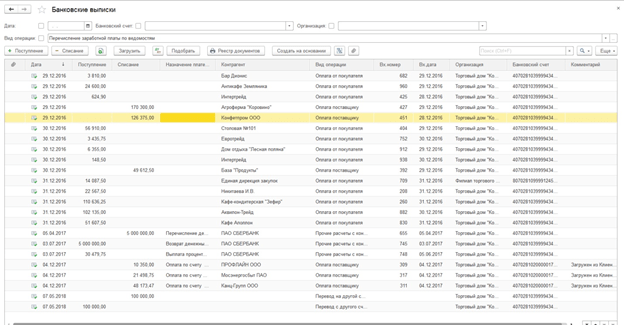
Fig.5
To make the document we need, click on "Receipt" or "Write-off", depending on what we need.
Fig.6
Here we fill in the main fields in the same way as filling out a payment order:

Fig.7
After filling in all the fields, we check the correctness of the filled details and click "Record - Post".
In the documents "Receipt to the current account" and "Write-off from the current account" we look at the postings and check the correctness of their display through the "DtKt" button. Postings will be displayed in the opened window "Document movements".

Fig.8
After checking the correctness of the postings, click "Post and close."
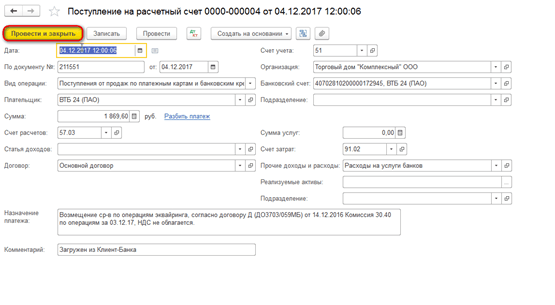
Fig.9
The second way to create "Receipt to the current account" and "Debit from the current account" by uploading a bank statement
Let's move on to sending documents to the bank. Being in the journal "Bank statements", click "MORE - Exchange with the bank."

Fig.10
In the "Exchange with the bank" window that opens, to upload documents to the client-bank, select the "Sending to the bank" tab:
- Choose a company for which we will upload documents;
- Specify a bank account;
- We select the period for which we need to upload a bank statement;
- Choose a location to upload the file.

Fig.11
The tabular part here will be filled with payments that need to be paid.
Opposite each payment that we want to pay, put down the "Flag" and click on the "Unload" button. This will open the "Check for virus attacks" window, where we click "Check".

Fig.12
A file will be generated in the “1c_to_kl.txt” format, which must be uploaded to the client bank.
In the "Exchange with the bank" window, you can see a report on the uploaded payment documents, for which we click "Upload Report". The resulting report will display the payments that were uploaded to a file for uploading to the "client bank". It can be saved in any format or printed.

Fig.13
Downloading an extract in 1C 8.3
The first option is from the "Download bank statement" tab.

Fig.14
Specify:
- Organization
- Bank account
- Download file
Click on the "Update from statement" button.
The tabular part will be filled with data from the file, while the lines highlighted in red mean that the program did not find data in the directories (r / account, counterparty by matching TIN and KPP), to which receipts or write-offs from the account should be distributed. Correctly distributed documents are highlighted in black.
Opposite each document that we want to upload, put down the "Flag". At the bottom of the window, information will be given on the number of documents to be uploaded, as well as "Total Receipts / Write-offs for the amount." Click "Download".

Fig.15
If the bank statement in 1C 8.3 was partially uploaded, the system will display this information in the tabular part of the "Exchange with the bank" window. Not uploaded documents will be displayed with the value "Not uploaded" in the "Document" column, for the uploaded documents, the information "Debit from the current account or Receipt to the current account", the number assigned to it and the date will be displayed.

Fig.16
You can view a report on downloaded documents. To do this, click on the "Upload Report" button.

Fig.17
Consider the second option, how to upload statements to 1C 8.3.
In the journal "Bank statements" click "Download".

Fig.18
Here we are looking for the statement download file and click "Open".

Fig.19
The program will automatically load and post the documents from the statement and display the number of loaded documents, as well as the total receipt amount and the total write-off amount.

Fig.20
Documents in the "Bank statement" journal, marked with a green flag, are posted and posted.

Fig.21
You will need to post and post the statement yourself if it is not marked with a green checkmark: open an unposted document, fill in the main required fields for posting the document, check the correctness of the filled details, click on the "Post" button, then "Post and close".

Fig.22
Document posted and distributed.
If you want to display the initial balances at the beginning and end of the day, as well as the total amounts received and debited for a given date in the bank statement journal, click "MORE - Show/Hide totals".

Fig.23
At the bottom of the journal, the initial balances at the beginning and end of the day will be displayed, as well as the total amounts received and written off on the date.
Consider setting up a client bank in 1C enterprise 8.2.
Setting up a bank client is very important. It greatly facilitates the life of an accountant from simple and routine work. In this article, we will only consider setting up data loading into 1C Enterprise Accounting 8.2 from client-bank files. We will not consider uploading data from a client bank - it is different for each of the banks. Consider how to download statements from a client bank in 1C.
Setting up a client bank with 1C
To set up a client bank in 1C 8.3, you must:
Go to the menu "Bank" - "Bank statements" - "Download":

Get 267 1C video lessons for free:
The system will report that there are no settings in the system, click "yes":

In step Maintained bank account you must specify the account to which payment orders will be sent. Listed The name of the program select the program from which you are uploading the file. For Sberbank, this is the “Client” workstation of AS “Client-Sberbank” of Sberbank of Russia.
File upload / download - setting the disk space where the exchange of payment orders between the client-bank and 1C 8.3 will take place. By default the files are named kl_to_1c.txt and 1c_to_kl.txt.
That's all. The client-bank setup is completed.
Loading payment orders
If your client-bank is set up, it is very easy to upload payment orders to 1C 8:
Related posts:
 What is a hedge fund: in simple words The largest hedge funds in the world
 Discount coupons from the company Lukoil Lukoil promotions at gas stations
 Profitable Forex Expert Advisors Best Forex Robots
 Reviews about Yandex.Money Bank. Personal account Yandex money Yandex cash
 Formation of an investment portfolio of cryptocurrencies Formation of a portfolio of cryptocurrencies


